IMPORTANT NOTE: In the time since this article was written I was advised that it is a bad practice to reuse an existing VB project to create a new project, as I have done here. It can lead to conflicts if multiple projects based on the same original project are installed on a system. What you should do instead is to start by creating a new project, and then copy and paste the sections of code you want to reuse from the original project to the new project.
Making Tools for TurboCAD
This section contains information about making tools for TurboCAD using Visual Basic. This goes beyond the scope of what can be accomplished using the VBA that is built-in to TurboCAD.
What I know about this subject was learned from studying the SDK examples, asking questions on the TurboCAD programming forum, and good old T&E (trial and error). One of the most helpful things for me was the TCVBTool example which Anatoli Albul posted to the forum. This example contains the basic source code that one needs to start with to make a plug-in tool for TurboCAD. This code is well documented with comments which pretty well explain everything.
What I will do here is to take the TCVBTool source and go a little further to clarify how to accomplish certain things with it.
Making a plug-in with multiple tools.For this example I am starting out with the TCVBTool source code and making the appropriate changes for the plug-in I am creating. This example shows how I made a plug-in containing five tools. The tools are very simple, they each change the paper color to a different color. I wanted to concentrate on how to use the TCVBTool source code to create the plug-in, and not get bogged down in code to execute some complex function in TurboCAD.
The first thing we must do is tell TurboCAD how many tools are in the plug-in. In the following line, we are setting up our plug-in to contain 5 tools:
Const NUM_TOOLS = 5
Then we set the Property Get Description:
      Public Property Get Description() As String
          Description = "Paper Color"
      End Property
Next we need to fill in the GetToolInfo section. The information here determines where the tool commands will be located in the application menus. Note that you can even create new items on the main menu bar. This section also sets up the toolbar location(s) for the tool buttons.
      Public Function GetToolInfo(CommandNames As Variant, MenuCaptions As Variant, StatusPrompts As Variant, _
          ToolTips As Variant, Enabled As Variant, WantsUpdates As Variant) As Long
          'ReDim CommandNames(NUM_TOOLS, 5)
          ReDim CommandNames(NUM_TOOLS) ', 5)
          ReDim MenuCaptions(NUM_TOOLS, 2)
          ReDim StatusPrompts(NUM_TOOLS)
          ReDim ToolTips(NUM_TOOLS)
          ReDim Enabled(NUM_TOOLS)
          ReDim WantsUpdates(NUM_TOOLS)
      ' full command name include menu , submenu where tool will be placed
          CommandNames(0) = "P&lug-ins|PaperColor|White"
          CommandNames(1) = "P&lug-ins|PaperColor|Light Yellow"
          CommandNames(2) = "P&lug-ins|PaperColor|Light Blue"
          CommandNames(3) = "P&lug-ins|PaperColor|Dark Blue"
          CommandNames(4) = "P&lug-ins|PaperColor|Black"
      ' in our case you can find these tool in Plug-ins\PaperColor submenu
          MenuCaptions(0, 0) = "White"
          MenuCaptions(1, 0) = "Light Yellow"
          MenuCaptions(2, 0) = "Light Blue"
          MenuCaptions(3, 0) = "Dark Blue"
          MenuCaptions(4, 0) = "Black"
       ' the following determines the toolbar(s) where tool buttons will be placed
          MenuCaptions(0, 1) = "Paper Colors"
          MenuCaptions(1, 1) = "Paper Colors"
          MenuCaptions(2, 1) = "Paper Colors"
          MenuCaptions(3, 1) = "Paper Colors"
          MenuCaptions(4, 1) = "Paper Colors"

       ' This is the text that appears in the status bar
          StatusPrompts(0) = "Change paper color to white"
          StatusPrompts(1) = "Change paper color to light yellow"
          StatusPrompts(2) = "Change paper color to light blue"
          StatusPrompts(3) = "Change paper color to dark blue"
          StatusPrompts(4) = "Change paper color to black"

          ToolTips(0) = "Change paper color to white"
          ToolTips(1) = "Change paper color to light yellow"
          ToolTips(2) = "Change paper color to light blue"
          ToolTips(3) = "Change paper color to dark blue"
          ToolTips(4) = "Change paper color to black"

          Enabled(0) = True
          Enabled(1) = True
          Enabled(2) = True
          Enabled(3) = True
          Enabled(4) = True

          WantsUpdates(0) = False
          WantsUpdates(1) = False
          WantsUpdates(2) = False
          WantsUpdates(3) = False
          WantsUpdates(4) = False
          GetToolInfo = NUM_TOOLS
      End Function
The next several sections in the code are the CopyBitmap, CopyPicture, Initialize, GetButtonPicture, and UpdateToolStatus functions. I have not messed around with these and leave them as is. I have also left the constant "boolLoadFromBmp" equal to false in the declaration section. This means I will have to place the images for my toolbar buttons in the resource file. You may have to add the resource editor to your VB IDE if you have not used it before. To do this, you run the Add-In Manager from the Add-Ins menu command.
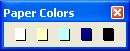
To edit the resource file, I first deleted the two bitmaps that are already there. Then I added the bitmaps (shown below) that I created for this plug-in. (More detail.) Note that the images for all the tool button faces for a given size are grouped in one bitmap. The bitmaps have to be made to a specific size. The application will break out the image for each button. For the large buttons, the bitmap must be (NUM_TOOLS * 24) pixels wide by 23 pixels high. For the normal sized, or small, buttons, the bitmap must be (NUM_TOOLS * 16) pixels wide by 15 pixels high. For this plug-in with five tools, each tool button will use 1/5 of the bitmap. The bitmaps shown below were easily made in Paint Shop Pro and saved as BMP files. Use the color magenta for areas that you want to be transparent on the button face.
This is how the normal sized buttons look in the tool bar when the plug-in is loaded into TurboCAD:
All that's left now is to add our tool code to the Run function and compile the DLL. Note the use of the Select Case function which determines which tool was picked to run, by tool index. In this case, the code to change the paper color is so simple I just wrote it right in the function. For more complex tools, you will probably want to call procedures from other code modules, or open up forms for operator input.
      Public Function Run(ByVal Tool As Object) As Boolean
          On Error GoTo ErrH
          Dim tcApp As Application
          Set tcApp = Tool.Application
          Select Case Tool.Index
            Case 0
               tcApp.Properties("PaperColor") = RGB(255, 255, 255)
            Case 1
               tcApp.Properties("PaperColor") = RGB(255, 255, 192)
            Case 2
               tcApp.Properties("PaperColor") = RGB(192, 255, 255)
            Case 3
               tcApp.Properties("PaperColor") = RGB(0, 0, 128)
            Case 4
               tcApp.Properties("PaperColor") = RGB(0, 0, 0)
         End Select
         Set tcApp = Nothing


          Run = True
          Exit Function

      ErrH:
          MsgBox "Run method " & Err.Description
          Set tcApp = Nothing


      End Function